CI-V Scout - A Quick Tutorial
This article will give a very short tutorial on how to use the CI-V Scout
command builder to send a command to a CI-V capable radio. The command I
will use for this tutorial is the "set operating frequency" command since
some variant of it is probably available in any CI-V capable radio. The
radio I am using for this tutorial is an ICOM IC-7300. The frequency
data format may be different for your radio.
The first thing you must do when you run CI-V Scout is to set the serial
port parameters for connecting to your radio. This will depend on your
particular hardware configuration. At a minimum you will need to select
the port and baud rate. The COM port must be the serial port that your
computer uses to communicate with your radio. The baud rate must match the
baud rate set in your radio settings. Once you have entered all of the
appropriate settings press the "Start" button to initiate serial
communications with your radio. If your radio's CI-V communications have
Transceive enabled, turning the main tuning knob should cause data to
appear in the lower section of the CI-V Scout window.
Once you have confirmed that communications with the radio are working
you can build the command to set the operating frequency. For the source
address we will use the default address of E0. The destination address
must be the CI-V address of your radio. In the case of the IC7300 the
default address is 94, so I enter that for the destination address. If
your radio is not an ICOM IC7300 the address will be different. You will
need to check with the documentation for your radio or check the settings
in the radio's menu to determine the correct address.
According to the documentation for the IC7300 the command to set the
operating frequency has a value of 05, so I enter that value for the
command. In this case there is no sub-command so that field must be left
blank. The data field requires a bit more description.
The IC7300 documentation shows the format for operating frequency as
follows:
IC7300 Operating Frequency Format
Byte 1
|
Byte 2
|
Byte 3
|
Byte 4
|
Byte 5
|
| X |
X |
X |
X |
X |
X |
X |
X |
0 |
0 |
10 Hz digit
|
1 Hz digit
|
1 KHz digit
|
100 Hz digit
|
100 KHz digit
|
10 KHz digit
|
10 MHz digit
|
1 MHz digit
|
1000 MHz digit
|
100 MHz digit
|
Note: Your radio may use a different format for representing
the frequency. Check the documentation for your radio model for more
details.
If we want to set the frequency to 14.175 MHz, we would need to send the
data sequence 00 50 17 14 00. You will need to enter those values in the
data builder in that specific order for the radio to be able to process
them. Once you have entered all of that your window should look like this:
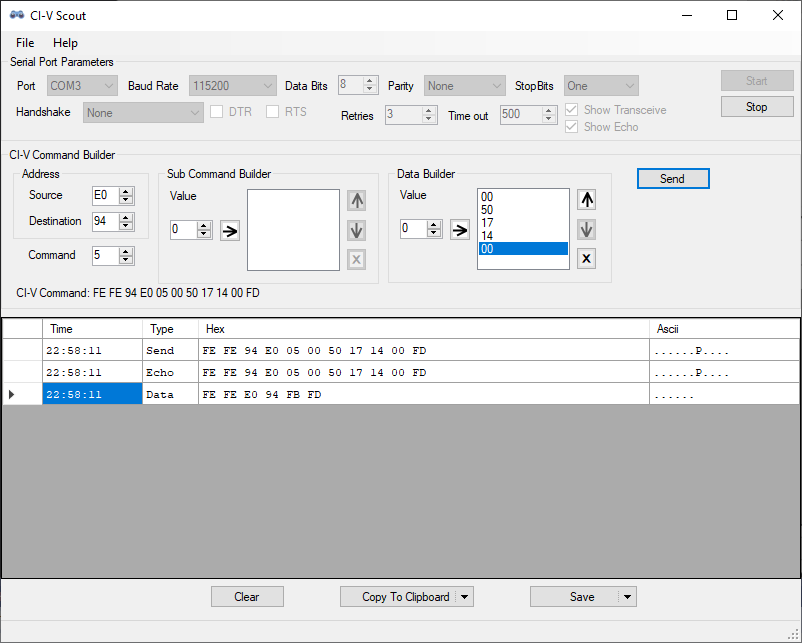
Now press the send button. If everything is entered correctly and the
radio and computer are communicating properly the operating frequency will
change to 14.175 MHz.
Congratulations on building the command and have fun.